【UnityShader】ソーベルフィルタ #83
前回の成果
ロドリゲスの回転公式を理解した。
今回やること
ソーベルフィルタを使用して、鉛筆で書いたようなShaderを制作します。
事前準備
Scene上にオブジェクトを配置します。
自分はアニメーションするものを配置したかったのでUnityちゃんを配置しました。

カメラに今回制作するScriptをアタッチします。
そのScriptのInspectorに今回制作したShaderのマテリアルをアタッチします。

ソースコード
Shader側
Shader "Unlit/PencilNoiseShader" {
    Properties {
        _MainTex ("Texture", 2D) = "white" {}
        _Brightness ("Brightness", Range(-1.0, 1.0)) = 0.2
        _OutlineThick ("_OutlineThick", Range(0.0, 1.0)) = 0.1
    }
    SubShader {
        Tags { "RenderType"="Opaque" }
        LOD 100

        Pass {
            CGPROGRAM
            #pragma vertex vert
            #pragma fragment frag

            #include "UnityCG.cginc"

            struct appdata {
                float4 vertex : POSITION;
                float2 uv : TEXCOORD0;
            };

            struct v2f {
                float2 uv : TEXCOORD0;
                float4 vertex : SV_POSITION;
            };

            sampler2D _MainTex;
            float4 _MainTex_ST;
            float4 _MainTex_TexelSize;
            float _Brightness;
            float _OutlineThick;

            float rand(float3 value) {
                return frac(sin(dot(value.xyz, float3(12.9898, 78.233, 56.787))) * 43758.5453);
            }

            float noise(float3 pos) {
                float3 floorPos = floor(pos);
                float3 stepPos = smoothstep(0, 1, frac(pos));
                float4 a = float4(
                    rand(floorPos + float3(0, 0, 0)),
                    rand(floorPos + float3(1, 0, 0)),
                    rand(floorPos + float3(0, 1, 0)),
                    rand(floorPos + float3(1, 1, 0)));
                float4 b = float4(
                    rand(floorPos + float3(0, 0, 1)),
                    rand(floorPos + float3(1, 0, 1)),
                    rand(floorPos + float3(0, 1, 1)),
                    rand(floorPos + float3(1, 1, 1)));
                a = lerp(a, b, stepPos.z);
                a.xy = lerp(a.xy, a.zw, stepPos.y);
                return lerp(a.x, a.y, stepPos.x);
            }

            float perlin(float3 pos) {
                return
                    (noise(pos) * 32 +
                    noise(pos * 2 ) * 16 +
                    noise(pos * 4) * 8 +
                    noise(pos * 8) * 4 +
                    noise(pos * 16) * 2 +
                    noise(pos * 32) ) / 63;
            }

            float monochrome(float3 col) {
                return 0.299 * col.r + 0.587 * col.g + 0.114 * col.b;
            }

            half3 Sobel(float2 uv) {
                float diffU = _MainTex_TexelSize.x * _OutlineThick;
                float diffV = _MainTex_TexelSize.y * _OutlineThick;
                half3 col00 = tex2D(_MainTex, uv + half2(-diffU, -diffV));
                half3 col01 = tex2D(_MainTex, uv + half2(-diffU, 0.0));
                half3 col02 = tex2D(_MainTex, uv + half2(-diffU, diffV));
                half3 col10 = tex2D(_MainTex, uv + half2(0.0, -diffV));
                half3 col12 = tex2D(_MainTex, uv + half2(0.0, diffV));
                half3 col20 = tex2D(_MainTex, uv + half2(diffU, -diffV));
                half3 col21 = tex2D(_MainTex, uv + half2(diffU, 0.0));
                half3 col22 = tex2D(_MainTex, uv + half2(diffU, diffV));

                half3 horizontalColor = 0;
                horizontalColor += col00 * -1.0;
                horizontalColor += col01 * -2.0;
                horizontalColor += col02 * -1.0;
                horizontalColor += col20;
                horizontalColor += col21 * 2.0;
                horizontalColor += col22;

                half3 verticalColor = 0;
                verticalColor += col00;
                verticalColor += col10 * 2.0;
                verticalColor += col20;
                verticalColor += col02 * -1.0;
                verticalColor += col12 * -2.0;
                verticalColor += col22 * -1.0;

                half3 outline = sqrt(horizontalColor * horizontalColor + verticalColor * verticalColor);
                return outline;
            }


            v2f vert (appdata v) {
                v2f o;
                o.vertex = UnityObjectToClipPos(v.vertex);
                o.uv = TRANSFORM_TEX(v.uv, _MainTex);
                return o;
            }

            fixed4 frag (v2f i) : SV_Target {
                float2 screenUV = i.uv * _ScreenParams.xy;
                i.uv += (float2(perlin(float3(screenUV, _Time.y)), perlin(float3(screenUV, _Time.y)))) * 0.01;
                float col = monochrome(tex2D(_MainTex, i.uv)) + _Brightness;
                col -= Sobel(i.uv);
                col *= perlin(float3(screenUV, _Time.y * 10)) * 0.5f + 0.8f;
                return float4(col, col, col, 1);
            }
            ENDCG
        }
    }
}
Script側
using UnityEngine;

public class PencilNoise : MonoBehaviour {

    [SerializeField]
    private Material _material;

    void OnRenderImage(RenderTexture src, RenderTexture dest) {
        Graphics.Blit(src, dest, _material);
    }
}
こちらはポストエフェクトの処理になります。
OnRenderImage関数に関しては、こちらを参照してください。
ソーベルフィルタとは
ソーベルフィルタとは、アウトラインを検出する際に用いられる空間フィルタの1種です。
ソーベルフィルタは、輝度差が少ないエッジも強調される特徴があります。
ですので、人間が目で見た時にエッジに見える場所が強調されやすいです。
以下の画像を見て頂けると分かりやすいと思います。
ソーベルフィルタの仕組み
ソーベルフィルタは、今から処理するピクセルを中心に8方向の色情報を取り出します。
その情報に対して、以下のカーネル(テーブル)を使用することで値を補正します。
本来処理しようとしている中心のピクセルには0が乗算されます。
その代わり、横方向であれば左右1ピクセルずつズレた座標、縦方向であれば上下1ピクセルずつズレた座標に、係数が乗算されます。
適応する範囲の上下左右中心の9ピクセル全て同じ色であれば、係数を乗算しても結果は0となります。
色の差が大きいと値も大きくなり、よって色の差が激しいピクセルを強調することができます。
実際の処理
half3 Sobel(float2 uv) {
    float diffU = _MainTex_TexelSize.x * _OutlineThick;
    float diffV = _MainTex_TexelSize.y * _OutlineThick;
    half3 col00 = tex2D(_MainTex, uv + half2(-diffU, -diffV));
    half3 col01 = tex2D(_MainTex, uv + half2(-diffU, 0.0));
    half3 col02 = tex2D(_MainTex, uv + half2(-diffU, diffV));
    half3 col10 = tex2D(_MainTex, uv + half2(0.0, -diffV));
    half3 col12 = tex2D(_MainTex, uv + half2(0.0, diffV));
    half3 col20 = tex2D(_MainTex, uv + half2(diffU, -diffV));
    half3 col21 = tex2D(_MainTex, uv + half2(diffU, 0.0));
    half3 col22 = tex2D(_MainTex, uv + half2(diffU, diffV));

    half3 horizontalColor = 0;
    horizontalColor += col00 * -1.0;
    horizontalColor += col01 * -2.0;
    horizontalColor += col02 * -1.0;
    horizontalColor += col20;
    horizontalColor += col21 * 2.0;
    horizontalColor += col22;

    half3 verticalColor = 0;
    verticalColor += col00;
    verticalColor += col10 * 2.0;
    verticalColor += col20;
    verticalColor += col02 * -1.0;
    verticalColor += col12 * -2.0;
    verticalColor += col22 * -1.0;

    half3 outline = sqrt(horizontalColor * horizontalColor + verticalColor * verticalColor);
    return outline;
}
こちらがソーベルフィルタの処理の部分となります。
_MainTex_TexelSize.xyは縦横の解像度を取得できるので、それを元にカーネルを制作しています。
次に、制作したカーネルを元に周りの色の縦方向と横方向の色を求めます。
最後に、縦方向と横方向の値をそれぞれ二乗してから平方根を求めます。
これは値のプラスマイナスを考慮することなく、値の純粋な大きさのみを見るためになります。
パーリンノイズ
float noise(float3 pos) {
    float3 floorPos = floor(pos);
    float3 stepPos = smoothstep(0, 1, frac(pos));
    float4 a = float4(
        rand(floorPos + float3(0, 0, 0)),
        rand(floorPos + float3(1, 0, 0)),
        rand(floorPos + float3(0, 1, 0)),
        rand(floorPos + float3(1, 1, 0)));
    float4 b = float4(
        rand(floorPos + float3(0, 0, 1)),
        rand(floorPos + float3(1, 0, 1)),
        rand(floorPos + float3(0, 1, 1)),
        rand(floorPos + float3(1, 1, 1)));
    a = lerp(a, b, stepPos.z);
    a.xy = lerp(a.xy, a.zw, stepPos.y);
    return lerp(a.x, a.y, stepPos.x);
}

float perlin(float3 pos) {
    return
        (noise(pos) * 32 +
        noise(pos * 2 ) * 16 +
        noise(pos * 4) * 8 +
        noise(pos * 8) * 4 +
        noise(pos * 16) * 2 +
        noise(pos * 32) ) / 63;
}
パーリンノイズとは、テクスチャ作成技法の1つです。
特徴として、疑似乱数的な見た目ですが、細部のスケール感が一定です。
ソースコードやパーリンノイズの詳しい説明に関しては、以前の記事で説明しているのでそちらを参考にしてください。
fragment
ソーベルフィルタとパーリンノイズの理解は出来たので、fragment shaderに対応していきます。
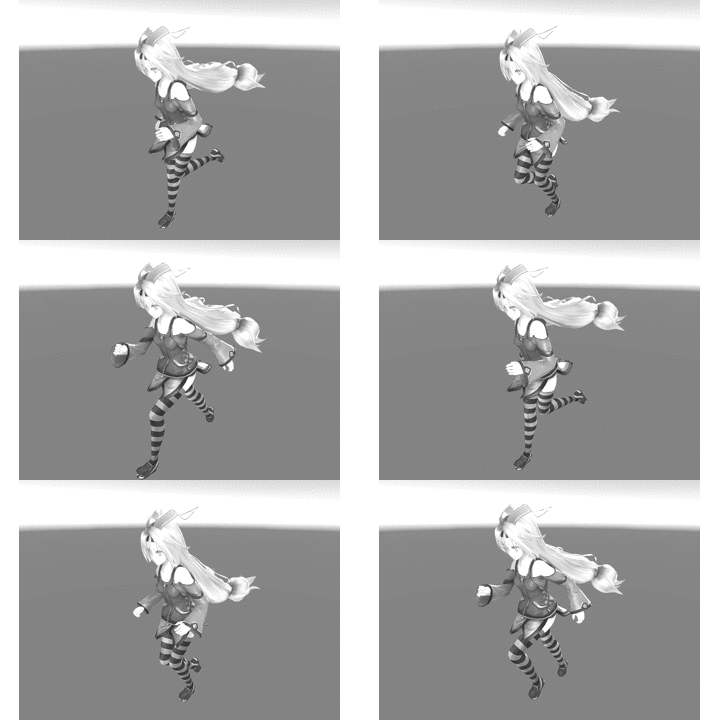
モノクロ(グレースケール)
モノクロ関数を使用して、カメラに映るものをグレースケールにさせます。
float col = monochrome(tex2D(_MainTex, i.uv)) + _Brightness;
手ぶれっぽくする
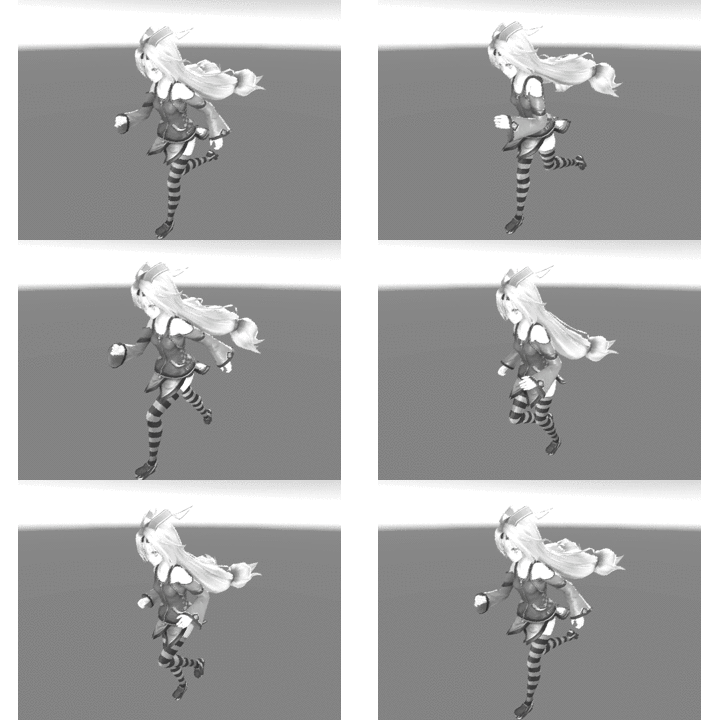
パーリンノイズを使用し、UV値をズラします。
そうすることにより、輪郭がズレて手ぶれのようになります。
float2 screenUV = i.uv * _ScreenParams.xy;
i.uv += (float2(perlin(float3(screenUV, _Time.y)), perlin(float3(screenUV, _Time.y)))) * 0.01;
ソーベルフィルタ
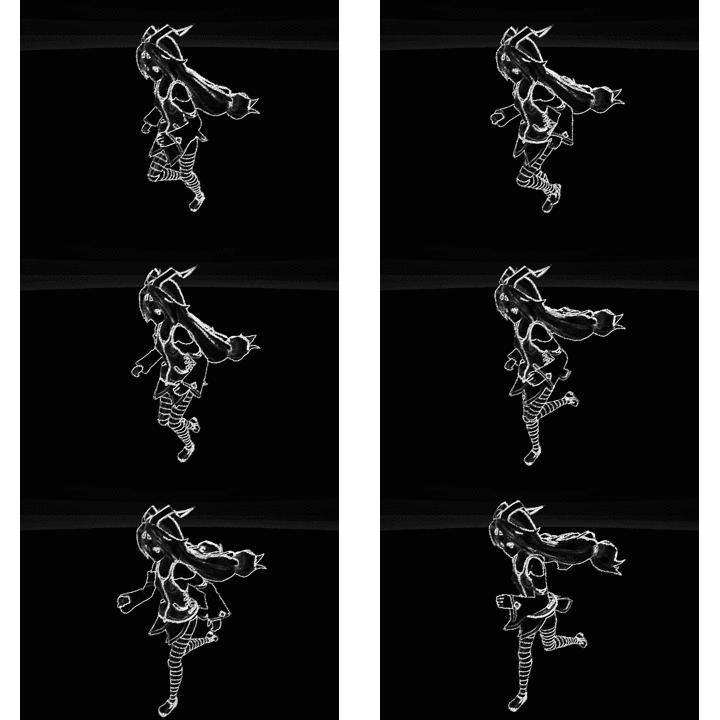
今回の本題であるソーベルフィルタをかけます。
ソーベルフィルタをかけることにより、エッジを検出してアウトラインを強調させます。
col -= Sobel(i.uv);

ソーベルフィルタのみにすると以下のようになります。
ブラーをかける
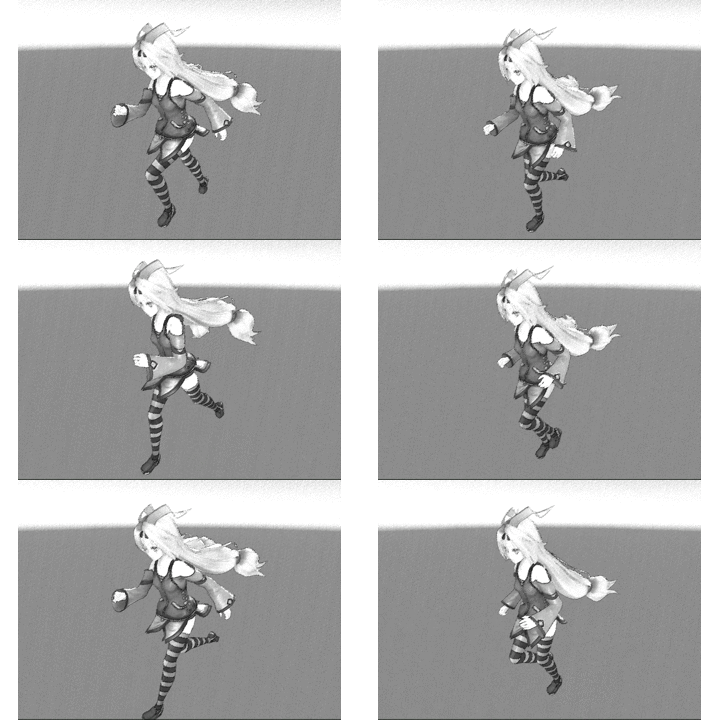
最後にパーリンノイズをかけます。
より鉛筆っぽさが出ると思います。
col *= perlin(float3(screenUV, _Time.y * 10)) * 0.5f + 0.8f;
結果
鉛筆風になれば成功です。

パラメータを変化させることで見た目を変化させることができます。
Brightnessを-1

Brightnessを1
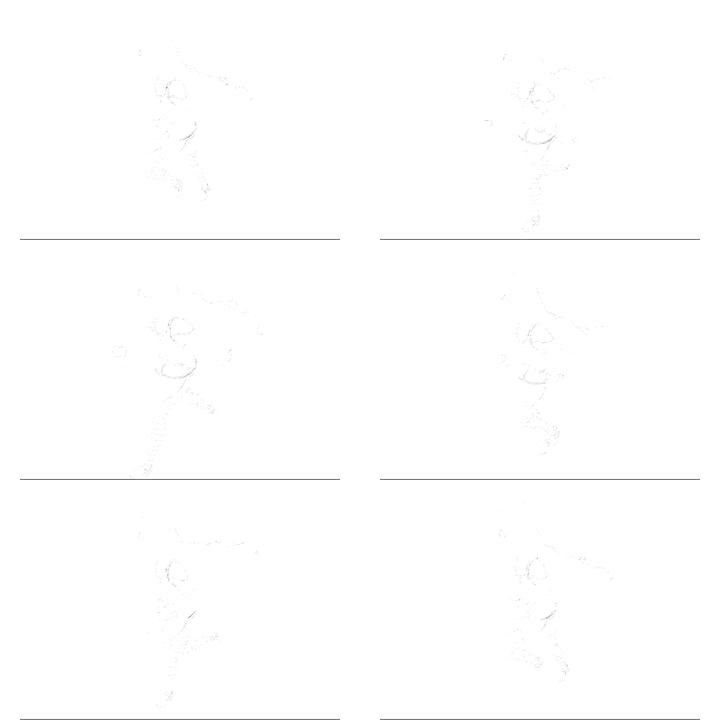
OutlineThickを0

OutlineThickを1

ソースコードにコメントを付与
Shader "Unlit/PencilNoiseShader" {
    Properties {
        _MainTex ("Texture", 2D) = "white" {}
        _Brightness ("Brightness", Range(-1.0, 1.0)) = 0.2
        _OutlineThick ("OutlineThick", Range(0.0, 1.0)) = 0.1
    }
    SubShader {
        Tags { "RenderType"="Opaque" }
        LOD 100

        Pass {
            CGPROGRAM
            #pragma vertex vert
            #pragma fragment frag

            #include "UnityCG.cginc"

            struct appdata {
                float4 vertex : POSITION;
                float2 uv : TEXCOORD0;
            };

            struct v2f {
                float2 uv : TEXCOORD0;
                float4 vertex : SV_POSITION;
            };

            sampler2D _MainTex;
            float4 _MainTex_ST;
            float4 _MainTex_TexelSize;
            float _Brightness;
            float _OutlineThick;

            // 乱数生成
            float rand(float3 value) {
                return frac(sin(dot(value.xyz, float3(12.9898, 78.233, 56.787))) * 43758.5453);
            }

            // ノイズ
            float noise(float3 pos) {
                float3 floorPos = floor(pos);
                float3 stepPos = smoothstep(0, 1, frac(pos));
                float4 a = float4(
                    rand(floorPos + float3(0, 0, 0)),
                    rand(floorPos + float3(1, 0, 0)),
                    rand(floorPos + float3(0, 1, 0)),
                    rand(floorPos + float3(1, 1, 0)));
                float4 b = float4(
                    rand(floorPos + float3(0, 0, 1)),
                    rand(floorPos + float3(1, 0, 1)),
                    rand(floorPos + float3(0, 1, 1)),
                    rand(floorPos + float3(1, 1, 1)));
                a = lerp(a, b, stepPos.z);
                a.xy = lerp(a.xy, a.zw, stepPos.y);
                return lerp(a.x, a.y, stepPos.x);
            }

            // パーリンノイズ
            float perlin(float3 pos) {
                return
                    (noise(pos) * 32 +
                    noise(pos * 2 ) * 16 +
                    noise(pos * 4) * 8 +
                    noise(pos * 8) * 4 +
                    noise(pos * 16) * 2 +
                    noise(pos * 32) ) / 63;
            }

            // モノクロ
            float monochrome(float3 col) {
                return 0.299 * col.r + 0.587 * col.g + 0.114 * col.b;
            }

            // ソーベルフィルタ
            half3 Sobel(float2 uv) {
                // 自身を中心とした上下左右8方向のピクセルをサンプリング
                float diffU = _MainTex_TexelSize.x * _OutlineThick;
                float diffV = _MainTex_TexelSize.y * _OutlineThick;
                half3 col00 = tex2D(_MainTex, uv + half2(-diffU, -diffV));
                half3 col01 = tex2D(_MainTex, uv + half2(-diffU, 0.0));
                half3 col02 = tex2D(_MainTex, uv + half2(-diffU, diffV));
                half3 col10 = tex2D(_MainTex, uv + half2(0.0, -diffV));
                half3 col12 = tex2D(_MainTex, uv + half2(0.0, diffV));
                half3 col20 = tex2D(_MainTex, uv + half2(diffU, -diffV));
                half3 col21 = tex2D(_MainTex, uv + half2(diffU, 0.0));
                half3 col22 = tex2D(_MainTex, uv + half2(diffU, diffV));

                // 横方向カーネル
                half3 horizontalColor = 0;
                horizontalColor += col00 * -1.0;
                horizontalColor += col01 * -2.0;
                horizontalColor += col02 * -1.0;
                horizontalColor += col20;
                horizontalColor += col21 * 2.0;
                horizontalColor += col22;

                // 縦方向カーネル
                half3 verticalColor = 0;
                verticalColor += col00;
                verticalColor += col10 * 2.0;
                verticalColor += col20;
                verticalColor += col02 * -1.0;
                verticalColor += col12 * -2.0;
                verticalColor += col22 * -1.0;

                // 色の差を求める
                half3 outline = sqrt(horizontalColor * horizontalColor + verticalColor * verticalColor);
                return outline;
            }


            v2f vert (appdata v) {
                v2f o;
                o.vertex = UnityObjectToClipPos(v.vertex);
                o.uv = TRANSFORM_TEX(v.uv, _MainTex);
                return o;
            }

            fixed4 frag (v2f i) : SV_Target {
                // 手ぶれのようにする
                float2 screenUV = i.uv * _ScreenParams.xy;
                i.uv += (float2(perlin(float3(screenUV, _Time.y)), perlin(float3(screenUV, _Time.y)))) * 0.01;
                // モノクロ
                float col = monochrome(tex2D(_MainTex, i.uv)) + _Brightness;
                // ソーベルフィルタ
                col -= Sobel(i.uv);
                // パーリンノイズで鉛筆風を強める
                col *= perlin(float3(screenUV, _Time.y * 10)) * 0.5f + 0.8f;
                return float4(col, col, col, 1);
            }
            ENDCG
        }
    }
}
今回は以上となります。
ここまでご視聴ありがとうございました。

この作品はユニティちゃんライセンス条項の元に提供されています
