【Unity Shader】Shader Graphでレイマーチング #118
はじめに
今回はShaderGraphを用いて、レイマーチングを行います。
以下記事にレイマーチングについてまとめていますので、こちらを参照しながら見ていただけると理解がより深まるかと思います。
コード
ShaderGraph
このような形でレイマーチングが可能になります。
Raymerching.hlsl
float RecursiveTetrahedron(float3 p, half3 offset, half scale)
{
    float4 z = float4(p, 1.0);

    for (int i = 0; i < 8; i++)
    {
        if (z.x + z.y < 0.0)
        {
            z.xy = -z.yx;
        }

        if (z.x + z.z < 0.0)
        {
            z.xz = -z.zx;
        }

        if (z.y + z.z < 0.0)
        {
            z.zy = -z.yz;
        }

        z *= scale;
        z.xyz -= offset * (scale - 1.0);

        // 適当に動かす
        z.xyz += sin(_Time.y) * 0.5;
    }

    return (length(z.xyz) - 1.5) / z.w;
}


float Dest(float3 p)
{
    return RecursiveTetrahedron(p, 1.0, 2.0);
}

float3 CalcNormal(float3 p)
{
    // 勾配
    float2 ep = float2(0, 0.001);
    return normalize(
        float3(
            Dest(p + ep.yxx) - Dest(p),
            Dest(p + ep.xyx) - Dest(p),
            Dest(p + ep.xxy) - Dest(p)
            ));
}

// 精度のサフィックスを指定する必要がある
void RayMarching_float(float3 rayPosition, float3 rayDirection,
    out bool hit, out float3 hitPosition, out float3 hitNormal)
{
    float3 pos = rayPosition;

    for (int i = 0; i < 64; i++)
    {
        float d = Dest(pos);
        pos += d * rayDirection;

        if (d < 0.001)
        {
            hit = true;
            hitPosition = pos;
            hitNormal = CalcNormal(pos);
            return;
        }
    }
}
GetLight.hlsl
void GetLight_float(out float3 direction, out half3 color)
{
    // shader graphのpreviewからライトを取得できないので適当な値を渡す
    #ifdef SHADERGRAPH_PREVIEW
    direction = half3(0.5, 0.5, 0);
    color = 1;
    #else
    Light light = GetMainLight();
    direction = light.direction;
    color = light.color;
    #endif
}
円の描画
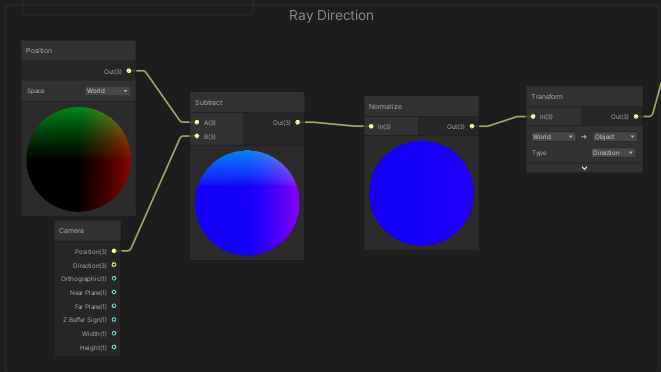
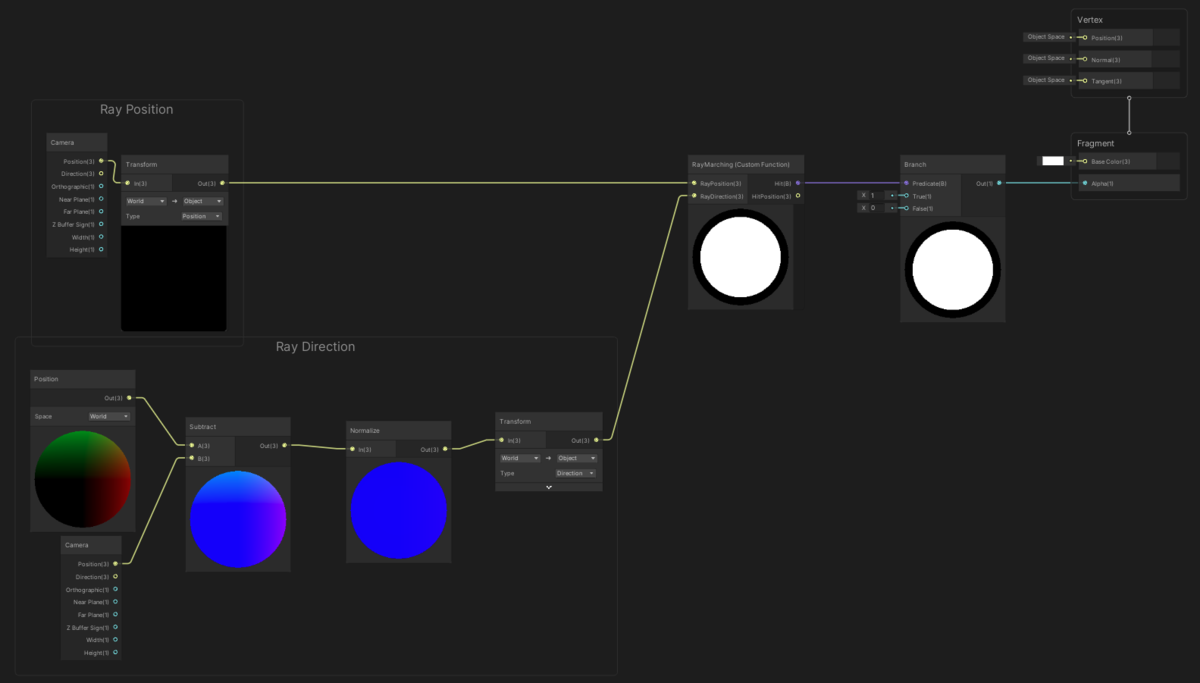
カメラの位置
レイを飛ばす前にカメラの位置を決めます。 カメラはCameraノードから取得できます。 また、Transformノードでワールド空間からオブジェクト空間へと変換します。

レイの向き
次にレイの向きを決めます。 シェーダーでいう
normalize(pos.xyz - _WorldSpaceCameraPos);
になります。
レイをすすめる
カメラの位置とレイの向きを決めることができたので、レイを進める処理を書きます。
ただし、ShaderGraphではループ処理を書くことができません。
なので、CustomFunctionノードを使用します。
RayMarching.hlsl
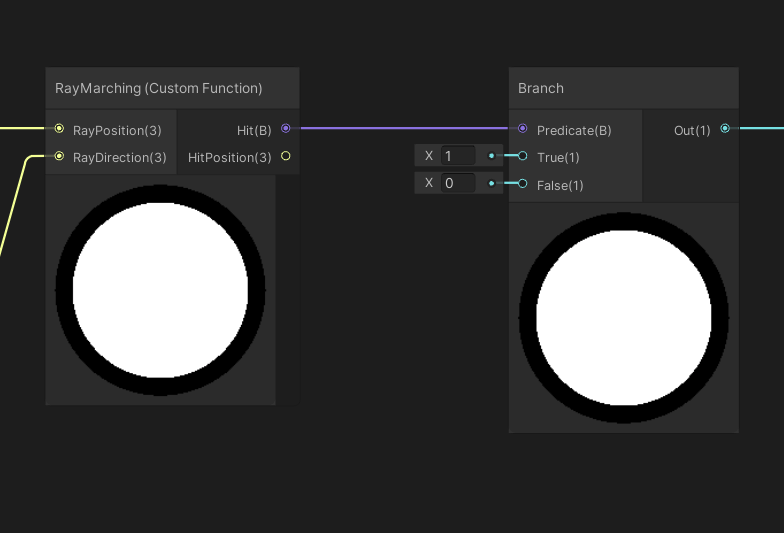
float Dest(float3 p)
{
    return length(p) - 0.5;
}

// 精度のサフィックスを指定する必要がある
void RayMarching_float(float3 rayPosition, float3 rayDirection,
    out bool hit, out float3 hitPosition)
{
    float3 pos = rayPosition;

    for (int i = 0; i < 64; i++)
    {
        float d = Dest(pos);
        pos += d * rayDirection;

        if (d < 0.001)
        {
            hit = true;
            hitPosition = pos;
            return;
        }
    }
}
CustomFunctionのinspector
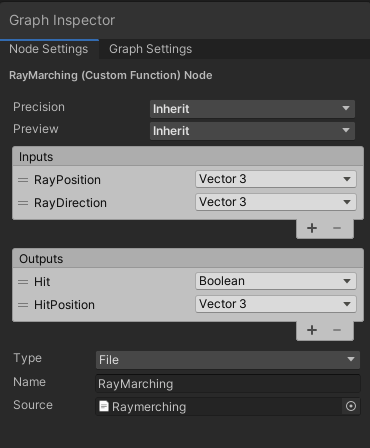
コメントにも記載していますが、CustomFunctionノードで呼び出す関数には精度のサフィックスを指定する必要があるので気をつけてください。
レイにあたった部分を描画
レイにあたった部分を描画するには、Branchノードを使用します。
今回は距離関数に円を使用しているので、これで円が表示されるはずです。
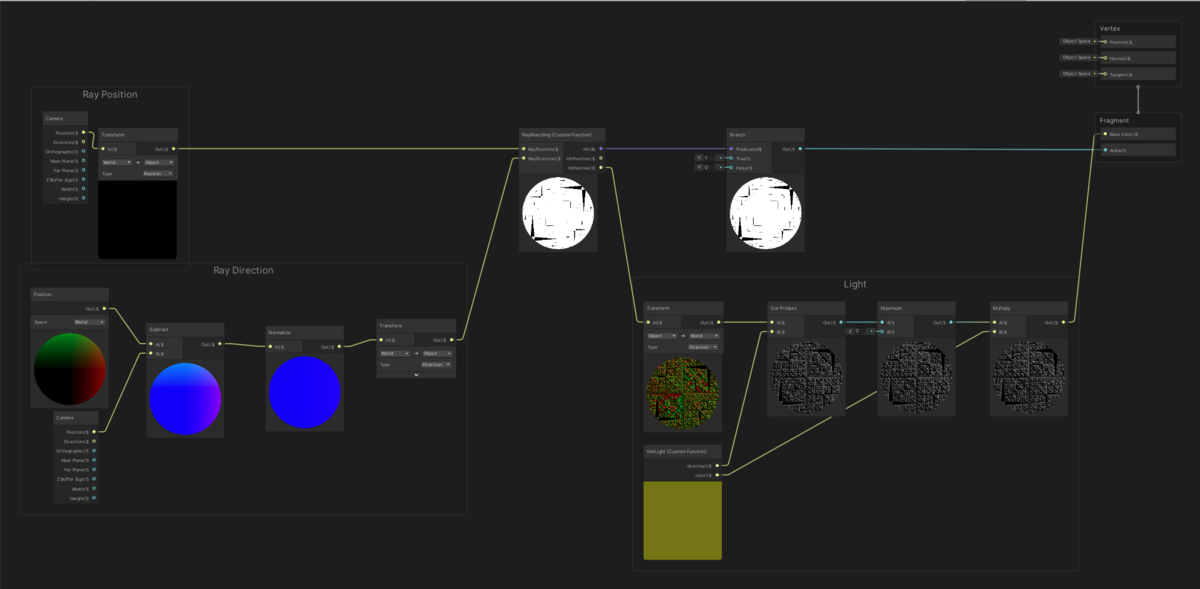
円を表示するレイマーチングの全体
ここまでの各ノードを繋げたものが以下のようなものになります。
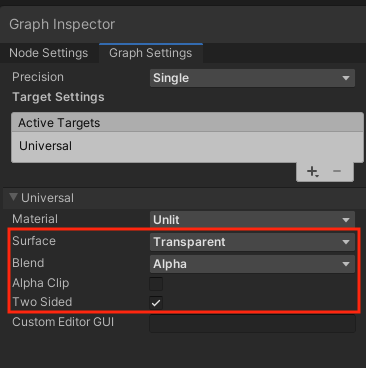
GraphSettingsで描画の設定を忘れないように指定してください。
今回は半透明なものを描画するので、TransparentとAlphaを指定します。
また、後述するレイマーチングにとって都合が良いのでTwoSidedのトグルを入れてください。
これは両面描画する命令を出すものになります。
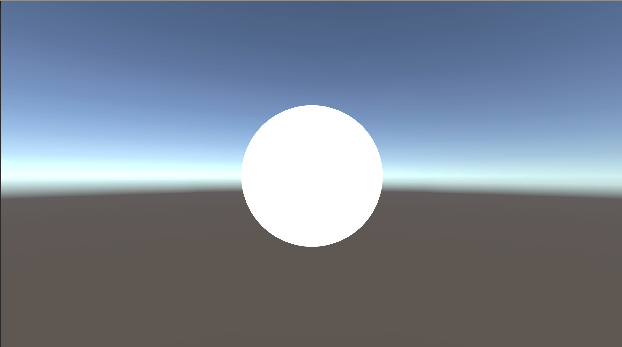
描画結果
以下の画像のようになっていれば成功です。
ライティング
シンプルにランバート拡散反射でライティングを実装します。
シェーダー上ですと、以下のように記述します。
float3 lightDir = normalize(_WorldSpaceLightPos0.xyz - (worldPos.xyz));
float3 diffuse = saturate(dot(normal, lightDir)) * _LightColor0;
ライトの向き
シェーダーグラフにDirectionalLightを取得するノードがないのでCustomFunctionで対応します。
GetLight.hlsl
void GetLight_float(out float3 direction, out half3 color)
{
    // shader graphのpreviewからライトを取得できないので適当な値を渡す
    #ifdef SHADERGRAPH_PREVIEW
    direction = half3(0.5, 0.5, 0);
    color = 1;
    #else
    Light light = GetMainLight();
    direction = light.direction;
    color = light.color;
    #endif
}
SHADERGRAPH_PREVIEW
これはShaderGraphのプレビュー上を判断するものになります。

プレビュー上ですと、後術するGetMainLight()が取得できずコンパイルエラーになってしまいます。
ですので、ifdefで区切ってあげてプレビューには適当な値を返してあげています。
SHADERGRAPH_PREVIEWはShaderGraph10.x以前では、"#if以降では#ifdefとなっています。
余談ですが、ideによってはエラーを返しますが無視してもUnity上では影響ありません。

GetMainLight
その名の通り、メインのライトを取得するものになります。
CustomFunctionのinspector

法線の追加
法線を取得するためにRayMarching.hlslを以下のように修正します。
float Dest(float3 p)
{
    return length(p) - 0.5;
}

// 追加
float3 CalcNormal(float3 p)
{
    // 勾配
    float2 ep = float2(0, 0.001);
    return normalize(
        float3(
            Dest(p + ep.yxx) - Dest(p),
            Dest(p + ep.xyx) - Dest(p),
            Dest(p + ep.xxy) - Dest(p)
            ));
}

// 精度のサフィックスを指定する必要がある
// out hit Normalを追加
void RayMarching_float(float3 rayPosition, float3 rayDirection,
    out bool hit, out float3 hitPosition, out float3 hitNormal)
{
    float3 pos = rayPosition;

    for (int i = 0; i < 64; i++)
    {
        float d = Dest(pos);
        pos += d * rayDirection;

        if (d < 0.001)
        {
            hit = true;
            hitPosition = pos;
            // 追加
            hitNormal = CalcNormal(pos);
            return;
        }
    }
}
これにより勾配で法線が取得できます。
CustomFunctionのinspectorに法線の引数を追加します。

ライティングのShaderGraph
ランバート拡散反射を反映したノード
ランバート拡散反射を元に、ノードを繋げていきます。
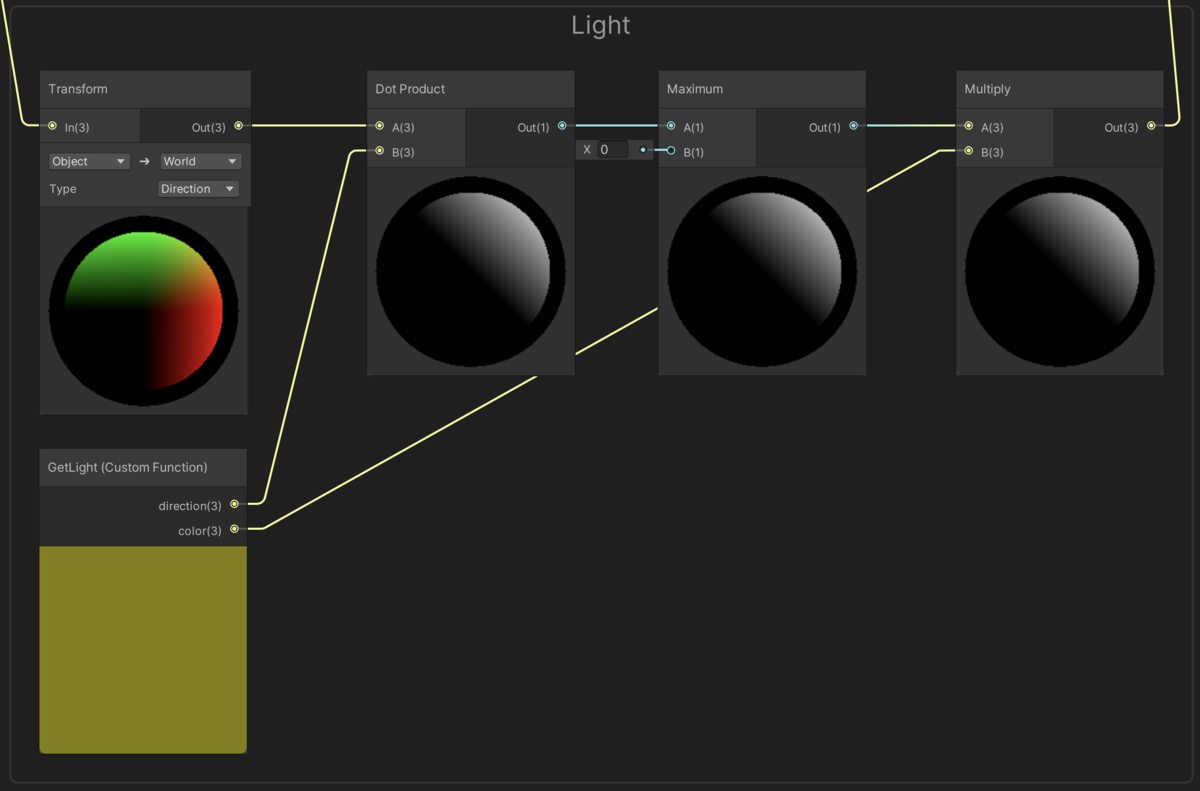
全体ノード
また、全体は以下のようになります。

描画結果
ライティングが反映されました。

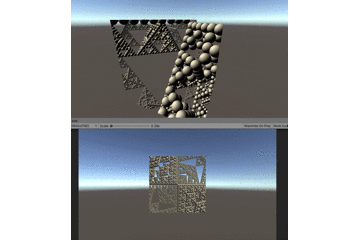
距離関数の変更
以下のサイト様のRecursive Tetrahedronを参考に距離関数を変更します。
RayMarching.hlsl
// 追加
float RecursiveTetrahedron(float3 p, half3 offset, half scale)
{
    float4 z = float4(p, 1.0);

    for (int i = 0; i < 8; i++)
    {
        if (z.x + z.y < 0.0)
        {
            z.xy = -z.yx;
        }

        if (z.x + z.z < 0.0)
        {
            z.xz = -z.zx;
        }

        if (z.y + z.z < 0.0)
        {
            z.zy = -z.yz;
        }

        z *= scale;
        z.xyz -= offset * (scale - 1.0);

        // 適当に動かす
        z.xyz += sin(_Time.y) * 0.5;
    }

    return (length(z.xyz) - 1.5) / z.w;
}


float Dest(float3 p)
{
    // 追加
    return RecursiveTetrahedron(p, 1.0, 2.0);
}

float3 CalcNormal(float3 p)
{
    // 勾配
    float2 ep = float2(0, 0.001);
    return normalize(
        float3(
            Dest(p + ep.yxx) - Dest(p),
            Dest(p + ep.xyx) - Dest(p),
            Dest(p + ep.xxy) - Dest(p)
            ));
}

// 精度のサフィックスを指定する必要がある
void RayMarching_float(float3 rayPosition, float3 rayDirection,
    out bool hit, out float3 hitPosition, out float3 hitNormal)
{
    float3 pos = rayPosition;

    for (int i = 0; i < 64; i++)
    {
        float d = Dest(pos);
        pos += d * rayDirection;

        if (d < 0.001)
        {
            hit = true;
            hitPosition = pos;
            hitNormal = CalcNormal(pos);
            return;
        }
    }
}
描画結果